Saturday, May 24, 2008

How To Make a Pocket Stove from a Soda Can

Introduction: So I'm sure that all of you have seen some of the articles out there about making camping/hiking stoves out of a soda can. I look at them all the time, but they have one big flaw. Most of them don't have enough pictures, don't explain how the stove works, and have very vague directions. I am going to try to write an article that contains all of these things, and is easy to understand. The stove that I am going to show you to make can be used for camping, hiking, sitting around, making light, or just watching stuff burn.

Instructions:

  1. Get two cans. Make sure that they are empty and dry on the inside.


  2. Cut the bottom off of one of the cans. Make a smooth cut (I used a razor blade). The cut should be a little further up the can than an inch.


  3. Do the same with the other can.


  4. On one of the cans, you should crimp the top. Do this by gripping the can with a pair of pliers every half inch and twisting.


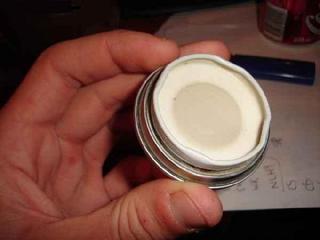
  5. Put the two bottoms of the cans together. The crimped can goes on top and inside of the uncrimped can. Press tightly to make sure that there is a good seal.


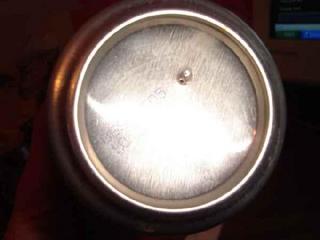
  6. Use a thumbtack to place a small hole in the lip of the upper can. The metal is fairly thick at this point, so it might take a little bit of force.

  7. Repeat this every 1/2 to 3/4 of an inch all the way around the can.


  8. Place a small group of holes (I used seven) in the center of the can that you just poked the holes around.


  9. Done
How it works:
  • The small group of holes that we cut on the top will be used for filling the stove. You have a few choices of fluid, but you can use any alcohol over 70%, or 140 proof. You can use denatured alcohol, HEET, or even vodka. Whatever works is fine, just don't use anything explosive like gasoline. I am going to use plain rubbing alcohol.


  • Once the can is filled, we are going to cover the group of holes with a penny and fill the "well" that the can makes with our fluid. The penny is used to make sure that the fluid stays in the "well" and does not go into the stove.

  • Carefully light the fluid that is filling the "well".


  • The burning fluid on top of the stove causes the metal that the stove is made of to heat up, which boils the fluid inside. When the fluid starts to boil, it turns into a flammable gas that starts to escape from the group of holes that we punched around the top. The flaming fluid on the top ignites this gas.


  • Once the fluid on top is used up, you end up with just the gas being burned that is coming out of the row of holes. This will continue to burn until the fluid inside runs out, or you cover with something and deprive it of oxygen.

  • Here are some pictures of the stove working: (sorry for the bad picture quality)


Monday, May 12, 2008

How to Blind a Camera Using a Laser

In this article I am going to explain to you a simple mechanism that you can use to blind a security camera, webcam, tv camera, camcorder, and most other optical recording devices. The idea is very simple, when a powerful laser is pointed directly at the lens of a camera, the lens is overwhelmed and cannot see. However, it is very difficult to precisely aim and keep a laser still from any practical distance. Here, I will show you an easy remedy for this problem.

    Materials


  • A powerful laser, can be any color that you choose. Your range will depend on the power of your laser. (I suggest the C.O.R.E. by Wicked Lasers)
  • A gun scope, binoculars, golf range finder, or other magnifying eyepiece. In this article I will use a gun scope.
  • A small tripod.


    Construction


  1. Start by attaching the laser to the gun scope in a fashion shown below. You can use any means of attachment that you want. Duct-tape, super glue, rubber bands, or string work well. Just make sure that the laser is on snugly and can be adjusted easily.


  2. Attach this unit to your tripod. Make sure that the whole unit is steady and well attached. If you plan on using this unit outdoors, it might be helpful to cover any critical components with a plastic shopping bag.


    Use


  • Before any use, the scope and laser must be properly aligned. To do this you should position the unit at the approximate distance from the camera that you will be using. Looking through the scope, move the laser into the center of the crosshairs, and lock the laser into place.
  • Move to the location that you are going to use, it is best to have a straight shot at the camera.
  • Look through the crosshairs and aim the unit at the target camera.
  • Turn your laser on and fine-tune the positioning of the dot onto the camera. You should know that the laser is aligned properly because the laser will cause a glare when it reflects off of the lens of the camera.
  • Lock the laser into the "on" position. This can be done simply by taping the button on most lasers down with a piece of strong piece of tape or tightly tying a piece of string around the laser over the button.

    Effect


    The following are demonstrations of the effect in action. Note the improved effect as the range is decreased. Also, using a green laser like the one mentioned above from Wicked Lasers will result in MUCH better result.


    In my experiments using the C.O.R.E., the results were much better. The camera was completely disabled and all that resulted was a white screen. This was from a 15m range using a Microsoft WebCam. I would highly suggest using at least a 5mW green laser over the 1mW red lasers that are shown in the above picture. For an ever better result, you could use a combination of red/green lasers, which would making filtering the image nearly impossible.

    The images used in the article are used with permission by Michael Naimark, from this website, where there is a lot more information about this topic.

    Monday, April 14, 2008

    How To Watch TV Shows and Listen to Music on Your Computer for Free

    There are a lot of good websites out there where you can watch tv shows online for free. Lately, I have been so busy that I haven't had the chance to catch all of the shows that I like to watch on tv, so I have been resorting to online streams. Here are my favorite links for (some legal, and some not so legal) websites where you can catch up on your shows, or just kill some time:


    TV Shows/Movies

    SouthParkStudios.com-
    Matt and Trey (the guys that make South Park) made this website where you can watch every episode of South Park free and uncensored. It contains short commercials, but it is definitely a good site.

    hulu.com
    This is a website that has partnered with NBC, FOX, and lots of other companies to bring you free streams of their popular shows. Some of my favorites are The Office, Scrubs, House, American Dad, It's Always Sunny in Philadelphia, King of the Hill and Futurama. They have tons of shows, you can check out the full directory of shows here. They also have a few good movies that you can check out here.

    WatchTVSitcoms.com
    This website has a ton of content. It isn't quite as legal as the first two, but it has a lot more content. There are tons of movies (lots of which are still in theatres), and lots of TV shows. Some of my favorites are Prison Break, Weeds, The Sopranos, and The Boondocks. No ads, but sometimes the videos don't work.

    CWTV.com
    This is the CW's site of videos. I don't watch this channel much, but I have some friends that really love it. The site looks pretty nice, and I'm pretty sure that the videos have ads in them.

    ComedyCentral.com
    I really only ever go to this site to watch clips of The Daily Show, but there are a lot of other clips from Comedy Central on there. It's worth a look.


    Music

    mp3000.net
    This website searches for mp3s on private servers. It is technically legal since they don't host any of the music, they just link to it. It has links to both listen to and download a file.

    mp3gle.com
    A lot like the site above, but sometimes their download link doesn't work very well. The streaming is very fast and good quality though.


    If all else fails just try BitTorrent!!! My favorite site for finding torrents is nowtorrents.com, it searches lots of different torrent sites and displays them in the same window.


    Good luck! Post any sites that I missed in the comments (Seinfeld?).

    Sunday, January 20, 2008

    How to Get Answers by Texting Google:

    So I've been using this a lot lately. You can get an answer to most questions by sending Google a text message (sms). To do it, simply send a message to 466453 (G-O-O-G-L-E).

    Here are some example of what you can do: (send the following commands)

    • definition aspartame (returns the definition of aspartame)
    • weather 90210 (returns the weather conditions for the zip code 90210)
    • score yankees (returns the score for the Yankees game)
    • movies 90210 (sends back a list of movies playing, you choose the movie and it returns movie times)
    • translate hello in german (gives you the word hello in german, 'hallo')
    • stock goog (returns stock quote for 'GOOG')

    You can even convert things:

    • 5 gallons in liters
    • 6 euros in usd

    There are a lot of other cool things that you can do with it. For more information, and an interactive demo check out Google's web page on the subject here.

    Friday, January 11, 2008

    How to Make a Homemade Collimator for Your Laser

    Article reproduced with permission by Vic from lasercommunity.com.

    In this Page, I will show you how to make an Homemade Collimator for your laser!
    A laser collimator is basically a laser beam adjuster.
    You could adjust the beam of your laser to as thin as hair(great for burning).
    Or you could adjust it to go as far as possible, also known as the mRad(the laser beam's divergence).
      Things Needed:
    • Concave Lens, About the size of your Laser(Look at picures)

    • Convex Lens, About the size of your Laser(Look at pictures)

    • Pen/Lead Pencil about as thick as your laser(Look at pictures)

    • Fire Source(To heat knife)

    • Knife(To Cut the "Pen/Lead Pencil")

    • Epoxy Glue, ask a hardware store for the best glue for glass)

    • File


    The Lenses I used were from an old Camera.

    Instructions:
    Step 1: Test your lenses(concave infront of laser, move convex lens back and forth) and write down the distance between the 2 lenses that you think has the best divergence.

    Step 2: Heat up a knife until it's red, make sure the knife's handle isn't metal, if it is, make sure to wear gloves.

    Step 3: Look at the picture below to see where to cut, leave some extra space for the larger tube.

    Step 4: Cut off/file down the pieces until you think the lens will fit (screw the 2 pieces together and look at your measurements from Step 1, look at the diagram and file down to about 1-3mm behind the dotted red line, DON'T GO PAST IT!!)

    Step 5: Mix a small amount of Epoxy glue, and use a toothpick to apply it to where you put the lens.


    Step 6: Let it dry

    Step 7: Use tape to stick it in front of your laser

    Step 8: Done!!!

    Monday, November 12, 2007

    How To Make a Stealth Can Sleeve:

    DISCLAIMER: In this article you are going to be cutting up an aluminum can. The pieces are really sharp. Be careful. We don’t take any responsibility for you cutting yourself.


    DISCLAIMER II: We wrote this article really fast, so our can sleeve doesn’t look very good. This really takes some time to do. Our results turned out ok, no one noticed that we weren’t actually drinking Dr. Pepper, but the more time and effort you put into this the better it will look.


    1. Get a soda can.

    2. Cut the top and bottom off of the can. Cut along the blue lines in the picture below. I used a utility knife for both sides, but if you have a can opener that cuts from the side, that works best for taking the top off. You’re on your own for the bottom. You want to cut right along the line where the printed label meets the silver aluminum part.


    3. It should look something like this:


    4. Cut the can lengthwise using a pair of sharp scissors. You want to cut it where the label overlaps, this is right beside the nutrition facts. (I realize that in the picture below, I hadn’t cut the bottom off yet, but you should. It works better)


    5. You should now have a big rectangle of aluminum. It should just be the label. Trim up an excess aluminum if you can.

    6. Roll the can up so that it is tight. This will make it stay over the can tightly. My cuts aren’t very clean. I did this really fast, you might want to take a little bit more time to make your cuts cleaner than mine. This is the time that you want to smooth out any wrinkles in the can too.


    7. Slip the sleeve around your beverage of choice


    8. Enjoy!


    This post was inspired by this youtube video by www.hellosmarty.com.

    Wednesday, November 07, 2007

    How to Build a Humidor for Cheap: (the Tupperdor)


    1. You will first need an appropriately sized container. I used a Rubbermaid Roughneck. Whatever you use, make sure that it is right size to fit your needs, and has an airtight seal.


    2. Wash your container with soap and water, twice. You want to remove the "plastic smell"

    3. Take off the lid, and cut a small viewing window in it. I used a CD case to seal the hole and make a small window to see in.

    4. Obtain a digital hygrometer/thermometer. I got mine at Wal-Mart for about six dollars. (Make sure that you remove the clip from the back to expose the air intake better)


    5. Attach the hygrometer to the lid so that you can see the display through the lid. Make sure that the seal between the CD case and the lid is airtight. I just used scotch tape to attach mine, but I'm sure that there are better ways. Someone reccomended a silicone bead.


    6. (Note that the conditions shown above are not ideal. Ideally, you want 70%RH, and 70(f))

    7. Get a humidification device. I use The Puck (www.cigarmony.com) and a Water Pillow (www.cigar.com). During the winter, you will need more humidification.


    8. Place an empty cigar box into your humidor, along with the humidification devices. I broke up another empty box and put it in there too, so that I would have more cedar wood to hold humidity.


    9. Rub down all of the cedar with a light coat of DISTILLED water. Also fill your humidification devices as directed.

    10. Seal the humidor and wait for the humidity to build. You want an ideal 70% relative humidity.

    11. Once you reach a proper humidity level, you may add your cigars into the cigar box


    12. Close everything up, and keep your cigars fresh!

    Wednesday, July 19, 2006

    How To Make a Secret Hollow Soda Can:

    For this you will need:

    • Coke cans/soft drink cans/beer cans whatever you can find or want to use (these cans must be unopened)

    • Sharp scalpel or knife

    • Can opener

    • 1 bag of plaster of paris

    • 1 small glass jar with metal screw on lid (small spring valley bottles or those small jam bottles are good)

    • cup or jug

    • glue gun or strong super glue


    Ok, now you have your materials, grab your unopened drink can and sharp knife/anything pointy and sharp.
    Then on the bottom of the can make a small hole to drain the liquid out of the can (pic 1) into a cup or jug, this can be messy so start off with a small hole and slowly make it bigger. Once the can is empty we get to the tricky bit, I have ended up having to restart after this step.


    Now to remove the top of the can. It’s actually not that hard once you know what you doing. Grab the can opener and grip it on the top of the can, making sure that the can opener is cutting the can part and not the top ’lid’ part. Some can openers won't allow you to cut like mine, but most will be able to do it properly.


    Once you have cut this lid off, clean it up and wash the can out thoroughly. The lid may contain a few little dags of metal so remove those if necessary. Now, you should be left with an empty can and a lid that fits on the top flush.


    Now, take the glass jar and remove the screwtop lid. Take the top of the can and glue the jar lid to the bottom. Wait until it dries and screw it on the jar to test to see if it strong enough.


    Now to fill the can with the plaster. Mix it up in a bowl and you will only need enough to fill the can about half way. Then use a small bit of silicone or glue and patch up the hole we made in the bottom of the can, you don’t want any plaster leaking.


    Take the top of the can with the lid glued to it and we screw it onto the jar. we then start to pour our plaster into the can filling it to about halfway. Once at half way, we take the jar and lid and place it in the can. This is to get the jar at the right height so it closes and looks like a normal can. If there is not enough plaster in the can, fill to the desired height and leave the lid on the can until the plaster has dried. We want the plaster to create a base for the jar but also hold it firmly inside the can. The plaster should cover at least half of the jar.


    After few hours, check to see if the plaster has dried. If it has, slowly unscrew the lid off the top of the can to test to see if the jar has held. Test screwing the lid on and off a few times just to see if everything is held and that is pretty much it.


    You can modify the can and make it a bit more stealthy, and that is to add a water (or any other type of liquid) pack to the bottom of the can and plaster over it. This creates a liquid sound inside the can when it is shaken, so it even sounds real.


    Article by RemadE.

    Friday, April 21, 2006

    How To Make a Sideways Room:

    Step 1. Get an empty room.


    Step 2. Paint the entire room white — including the floor.


    Step 3. Paint a window on the floor, just for fun. Then let the paint dry overnight. (I used electrical tape to make the window frame and bars.)


    Step 4. Bring in a couch, nail up a rug on the wall, and hang a table over it (we used monofilament thread from the hardware store).


    Step 5. Add a poster and a light switch on the ceiling for effect. (We also threw in a fake power outlet mounted sideways on the far wall, which you can see in the first picture up top. The other outlet in that picture, which looks much too high to reach, damages the effect — I should have painted it white.)


    Step 6. Reinstall the curtain rod and tack up the drapes to make them hang sideways. Stick some stuff to the table in a suggestive manner.


    Step 7. Nail a trash bin high up in a corner of the room, and arrange some trash around it. "Lean" a broom against the ceiling (again using monofilament thread).


    Step 8. Add a bookshelf and fill it with books. Also add an end table and hang a lamp on it.


    Step 9. Suspend a ceiling lamp and its cord so it "hangs" sideways out of the opposite wall into the middle of the room. (Unfortunately, we don't have a good picture of this.)

    Step 10. And the coup de grĂ¢ce — affix a chair high on the wall (using metal L-brackets). This one change suddenly added a whole new level of vertigo. Standing in the room began to feel like floating overhead.


    Step 11. Cackle evilly. Or giggle uncontrollably. Or both.

    The whole thing took two days (one day for painting, one day for arranging everything else). Hope you enjoyed this as much as we did. This project really made me want to do crazy art installations for a living.


    Original Tutorial by Zestyping.